May 28, 2009

seam ripper and cork


The real secret here is the cork. Of course, where would I be without a seam ripper? I've ripped out 32 seams so far on the corset I'm currently working on. (26 of those were taking apart the pieces from the last fitting, but they count.) I can't imagine picking those seams out with a small pair of scissors. 

But the cork. I have yet to find anything better for capping the end of the seam ripper. Hard plastic caps crack, soft plastic covers are eventually sliced through. I've tried taping covers on, which gums things up, and a small knot of fabric was soon shredded. However, the cork does not come off until I want it to, it protects other items in my sewing kit from the seam ripper, it's easy to put on and take off, and, if I accidentally drop it between the washing machine and the dryer, it's easily replaceable. A cork also makes the seam ripper immediately identifiable. Gone are the days of, "Is that the seam ripper? Nope, it's the screwdriver." If anyone knows of a better stopper for the end of a seam ripper please let me know. 

So let's raise a glass to the cork. Oh, and the seam ripper too.

May 26, 2009

the tailor's shuriken


Sometimes it's a hassle to have to uncoil the tape measure, line it up against the fabric, and count out 13/32 to mark a spot. Especially if you have to do it multiple times, say for measuring the distance between bone casings or marking how long embroidery stitches must be. A tailor's shuriken is the weapon of choice for these situations. Just rotate the disc to the desired measurement and hold it to the fabric. Easy peasy.


I can not vouch for the accuracy of this as a throwing star, only as a measuring device. I also can not vouch for the accuracy of the term "tailor's shuriken." There could be another name for this tool. I wouldn't use it though. 

May 24, 2009

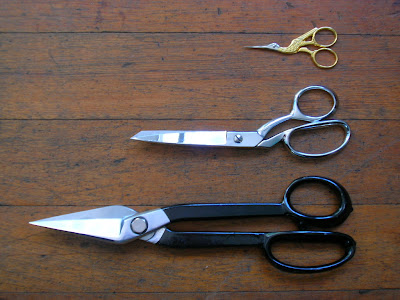
salute to scissors


For the next ten days I will be separated from my sewing machine by 2000 miles, so it's time for a salute to sewing tools. First up, scissors. 


I love my scissors. I have many pairs, these are just the first three I grabbed. My favorite are the Gingher 8" dressmaker's shears in the center, they cut fabrics perfectly and stay nice and sharp. I never let them touch paper. That's what those giant ones at the bottom are for, cutting cardstock when patterning. I no longer use those much, I've discovered I can cut patterns much quicker and more accurately with and X-ACTO blade, but they are still an impressive pair of scissors. The little crane embroidery scissors are also from Gingher. When my mother gave them to me I thought, "When am I going to use these?" The answer, all the time. If you enjoy looking at scissors (and who doesn't?) you can browse through museum collections and find interesting ones like this pair.

© Victoria & Albert Museum (museum number 402-1894)

Or you can take a look here and get a nice overview of various scissors designs.

May 22, 2009

taking shape


With the bone casings sewn the the silhouette is more visible. It looks like this corset will have a nice shape.


I'm not thrilled with the puckering and hope pressing will smooth everything out.  But I am pleased with the waist tape. It doesn't show through so much it distracts, which I had been worried about. Here it is from the inside.


I was so happy when I flipped the corset to take the picture and it held the curve at the waist instead of going flat. I think (hope) that's an indication of the even nicer shape to come.

May 20, 2009

waist tape


Patterning a waist belt proved to be difficult. Cutting one piece of fabric to run around the waist and flare with the curve of the body, that is not cut on the bias, is beyond me. At least with the corset patterned as is. If I made changes to my altered pattern I think it's doable, but that can be done with a future corset. For this one I'll just sew in a regular waist tape. I've pinned petersham ribbon in the interior of the corset at the waist line.


The waist tape will be held in place by the sewn bone casings. Here's a view of the basted on casings from the exterior of the corset.


You can see the exact moment I realized I didn't need to baste all the bone casings as securely as they were over the cording at the bust. There it is, at the waist line, on the casing between the third and fourth panels. 

The casings that will go one the first panel between the busk and the seam of the second panel, and on the last panel between the seam and the lacing, will be placed after I sew the busk and lacing strip on. I should probably do them before, but I want to evenly split the difference in space and am afraid a casing will be off to one side if I sew them first. And I made a change on the casing for the fourth panel. On Norah Waugh's pattern it's two pieces of boning in a wide casing. But a 1 inch wide casing left less than 1/4 inch on each side of the next casing and it looked bulky and off balance. I'm going with a single piece of boning and have faith it will do the job.

May 17, 2009

a chocolate situation


I thought I would put the wait while serving jury duty to good use and baste the bone casings. I took the corset to the courthouse and did get some basting done. While enjoying a Peppermint Patty I was called for jury action. I put the unfinished Patty away. Later, I discovered I'd managed to put the plastic bag with the Peppermint Patty into the pillowcase with the corset and not in another section of the tote bag I was carrying everything in. Of course the Peppermint Patty escaped and chocolate marks were scattered all over the corset. After very carefully spot cleaning with a Q-tip dipped in Gonzo stain remover, (Always tapping, never rubbing, the stain.) and thoroughly flushing the cleansed areas with water, I air dried the corset. Everything came out. When ironing the corset I realized I forgot to put the waist tape in place before basting the bone casings. I was also reminded how important the waist tape is, especially with this open weave fabric. So the basting stitches are being picked out to the waist so I can sew the waist tape in first. Brother. 

I normally keep food and beverages far from sewing projects and this is a lesson that I should never, NEVER, think I there is any way to mix the two.

May 15, 2009

cane boning test


Nothing goes to waste. One of the early corded appliques that didn't get used was perfect to test the boning with. I wanted to see how bulky everything would be once the boning was added, and also wanted to get an idea how strong the cane would be. I sewed a piece of casing over the cording and slid a small piece of cane in.


To test how the cane would curve over the bust and hips I soaked it in water, slid it in the channel, and arched it between to weights until it dried. It holds the curve nicely. The only problem is the hint of color. When I slid the cane in dry you saw nothing. But wet it tints the fabric. I'll have to do further tests to see if lightly sanding the cane removes any potential color transfer, or maybe if a light coat of gesso keeps it clean looking. I can also try soaking, shaping, then sliding the curved cane in when dry. Or just slide it in as is and forget about it, letting the canes bend to shape with wear, and hope they don't color the channels over time.

It's curious how every decision leads to more decisions.

May 13, 2009

casing basting


The bones will be held in coutil casings that I'll make. Pre-made casing is available, but I want the casing fabric to match the corded fabric since they'll be sewn on the outside of the corset. After cutting bias strips I ran them through a bias tape maker.


Then I basted the casing in place over a seam. I could be going a bit overboard with my stitching. But I want the bone casings neat and tidy, and basting them in position will make sewing them with the machine easier. 


I have 22 bone casings to stitch down. I could be basting for a while.

May 10, 2009

a preview


The seam allowances were stitched down 1/16 inch from the seam.


Then they were graded. To get an idea of how everything will look when finished I pinned bias tape and the busk panel to the corset.


I don't like how wide the busk panel looks on the right hand side with the space for boning right next to the busk. I'm getting rid of that piece of boning. But other than that, so far, so good.

May 8, 2009

putting the pieces together


Each string was carefully pulled away from the seam allowance along the bust. Then on the second panel I pulled it back 1/4 inch more. No need to have extra bulk under the bone casing that will run along that side of the seam. When the piece is held to the light it's easy to see where the cords end.


I pinned the pieces together along the seam line. When they are held to the light you can see how the corded sections meet the seam line at different angles.


But when sewn together and viewed head on the angle looks balanced.


It's possible if I'd placed the cording on the second panel at the same angle as the cording on center front panel it would have looked way too steep, or lopsided. I can't say for certain though, I just placed it so it looked right during the try-on. That's the angle that occurred and I went with it. The seams are on the outside because they will be trimmed and covered with bone casing. That way the interior of the corset will be nice and smooth. Look at the stitching from the inside.


The stitching on the bottom two rows of the other half is 1/16 inch off. I'll live with it. 

May 7, 2009

the mighty tailor's ham


I love my tailor's ham. I could not press curved seams without it. I also discovered it's a big help when pinning curved seams together. Here are two pieces, one with a convex (hill) curve and the other with a concave (valley) curve.


Even though the seam line is the same length on each, the convex seam allowance is a wider curve so there is more fabric along the it's edge, which means I can't pin by just matching up the seam allowances. But if I drape the pieces over the ham,


the seam line easily slides into place. Neat.

You don't even have to buy a ham. It's the easiest project. Draw an egg shape about the size of an iron, add seam allowance, and sew a scrap of cotton and a scrap of wool together. Leave an opening on the larger end so you can turn the whole thing right side out and fill the ham. I was told they should be filled with saw dust so if you use steam it is drawn through the fabric. I filled mine with with wood bedding material I picked up at the pet store.


Pack, pack, pack it in. And when you think it's full, pack some more. I jammed the wood chips in with a pestle until my hands were sore. But look at this ham.

May 6, 2009

cording in action


Finally, I can start building this corset. After picking out all the seams from the try-on, and ironing the fabric, I was ready to start sewing.

I cut the pieces for the cording on the fold, and placed the first one on the center front piece, matching the notches at the apex. It fit exactly as it should. Whew. I pinned the bottom layer to the adia cloth, and tucked a piece of crochet string inside the fold. I sewed the pieces together along the cording.


The new top edge has been marked by basting a line with red thread instead of cutting the excess fabric off. I can trim everything when the corset is sewn together. This is probably where tailor's tacks would be useful, I'll have to learn how to do them.

Anyway, because the bottom layer was pinned in place it couldn't bulge under the cording. It stayed flat and the top layer accommodated the string. Each time I laid down a piece of string I grooved along it with my finger nail to help the top layer fit snugly over the string. I sewed 7 rows of cording this way. Then I measured 1/4 inch, laid a piece of string next to that space, trimmed the seam allowance off the bottom piece, and tucked the seam allowance from the top piece under.


I stitched the cording in place.


Ta da!

May 5, 2009

and re-patterning


Aiming for perfection, once the angle of the top edge was changed and the busk panel was patterned, I felt compelled to re-pattern the corded sections. The whole point of a pattern is to serve as a plan so you don't have to figure everything out again. If I make the pattern pieces correctly this time I can just cut and sew the next. Well, at least in theory.

The corded piece of the center front panel will be smaller than what I originally patterned since the busk panel covers 1/3 the width of the first piece. I traced the center front piece onto paper and with a tracing wheel and  marked where I had positioned the cording. I folded the seam allowances in on the busk panel pattern and laid it against the center front. Then I marked the busk panel on the new pattern piece.


I added 1/2 inch seam allowance to each side and the bottom edge. (The new plan is to cut the piece on a fold and sew the cording between the folded fabric. I think this will be more efficient than dealing with two little pieces.) I re-patterned the second corded piece the same way.


Back to sewing.

May 4, 2009

still patterning


It seems like pattern making is never done. I need a front panel and a facing to secure the spoon busk in place. But I had to make the changes to top and bottom edges before I moved forward. I traced the revised neckline and bottom edge on to the pattern.


Once I trimmed the pattern piece I had the official center top and bottom points, so I could continue patterning for the busk. I traced off a whole new center front piece, then placed the busk on center front edge, leaving enough room at the bottom for binding, and letting any extra space fall at the top. I can always put in a pair of eyelets and a ribbon tie if I need to. I traced around the busk.


I added 3/8 inch for boning to run next to the busk.


I added another 1/4 next to that to tuck under as seam allowance, and a 1/2 inch seam allowance at the center front, and cut it out. 


Busk panel and facing patterned!