June 27, 2010

baleen


While the hand is healing I thought I'd share something I found.


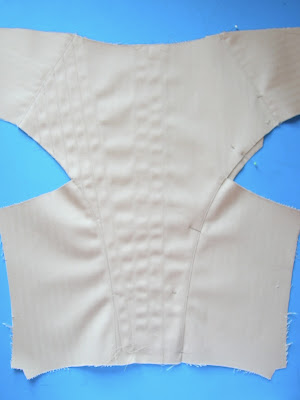
Bone casings salvaged from an old victorian bodice. And what was the boning hiding inside?
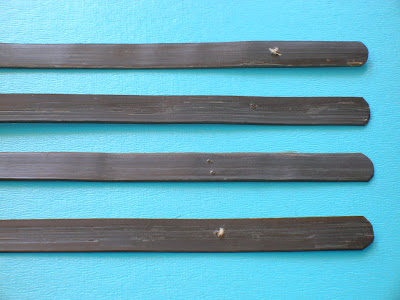

Unless I'm mistaken, that's whalebone. I am not going to store this in a drawer of sacred things. There are 13 pieces measuring between 9 and 5 inches, enough to provide support for a ribbon corset, so I plan on using this. To the whales I say, thank you. I know the way we used you was horrible, but it seems like it would be equally bad to not use and appreciate this baleen now.

I've never seen genuine baleen before, if anyone out there has please let me know if I'm correct in thinking that is what I have. And if you've been fortunate enough to work with old whalebone is there anything I need to know ?

June 26, 2010

ow


Three eyelets in I suffered a hand injury.


I wish there was an exciting story about how it happened, there isn't. Hand sewn eyelets were not at fault, just a casualty. The last stitch I took was Tuesday. I'm debating completing the stays with grommets instead of eyelets so I can keep my deadline. Self imposed or not a deadline is a deadline. Right?

June 20, 2010

stupid eyelets


Look at these sad eyelets.


The first one, on the far left, I pushed the awl from the front of the fabric to the back. For the second I pushed the awl from the back to the front. I punched a small hole through the fabric for the third. And the fourth finally looked decent, but it was only through two layers of fabric instead of four, like the others, and I'll be working with four on the final piece because of the seam allowances. On the chance that maybe it wasn't just lesser layers that caused the improvement, but that I actually got better over the course of just four eyelets, I sewed one more.


It was me that got better! This eyelet is stitched through four layers of coutil with heavy duty thread. The pattern shows 58 eyelets so I better get to work.

June 16, 2010

instead of sewing eyelets I made hair extensions


I accidentally cut my hair. Or rather, I knowing took the scissors to it myself and now regret it. I fixed it by whipping up some hair extensions.


I bought wavy brown human hair at a local beauty supply and dyed it with Clairol to match my hair. After it dried I ironed the track of sewn hair so it wouldn't have hard kinks from being folded in the original packaging.


I cut the hair into 8 inch sections and folded them in half so the track was doubled and the finished extensions would each be 4 inches wide. I stitched on wig clips. Once they were clipped into my hair I pulled them back into a luxurious loose pony tail.


Voila. Instant long hair. Not bad for just $40.

June 15, 2010

1650 bodice foundation


The bodice foundation is together. I assembled the front pieces the same way I assembled the back, with separate pieces for the channels. The big difference is that on the front piece I pinned the channel piece in place and sewed from the front with the stitch in the ditch of the already sewn. That way it will be nice and neat when seen from the interior of the finished garment.


The final boning channel panel was pinned in place at the center front.


Then I sewed, pressed, and folded the panels around just the way I would on the center front of a corset with a busk, except that I don't have to insert a busk because this bodice will lace in front.


Then the channels were sewn. You can see above that the seam at the center front is the only one I didn't trim, that's so there is more fabric for the grommets to grip. Once all the channels were done I sewed the front and back halves together at the side seams. And pressed. And graded. And pressed again. Here it is from the side the will be covered with the fashion fabric.


And here it what it will look like from the interior.


The question now is how to finish the holes for the lacing? The holes are close together, just 1/2 inch between each. Grommets will take up a lot of space, but hand bound eyelets? I knew sooner or later I'd have to tackle hand bound eyelets, but is that time now?

June 11, 2010

foundation construction


The plan is to make the foundation separately from the bodice fashion fabric then attached them together. I don't want two layers of coutil for the foundation, just one with additional fabric to make channels for the boning. I made patterns to cut the channel fabric by lining the pattern up with the channels on the grain line and tracing around what was needed.


before I added the channel pieces I sewed the other pieces together, stay stitched, then graded the seam allowances.


Then I laid the channel pieces in place and stitched using 1/2 inch wide tape as a guide to keep the stitch lines perfect.


Here is the back of the bodice foundation partially completed.


And here is what it will look like from the interior of the garment.


Nice and clean. I am worried about the waviness happening. I pressed the fabric before I cut it, after it was stitched together, and again after the seams were graded, but the waves. I believe it will be gone once the boning is in place, but still. Stupid waves. Anyway, I'll build the front of the bodice foundation the same way then stitch them together. Then the lacing, then I'll move on to the outer layer and the sleeves.

June 7, 2010

1650 pattern and foundation fabric


All I had to do to finish the pattern was put notches in.


Easy enough. The bodice foundation will be made of flesh tone coutil imported from England.


Such nice fabric. The exterior and the sleeves will be made of linen I have in the stash bins. I haven't decided whether I'll expose the front lacing on the final garment or not. Thoughts?

June 5, 2010

the worst pictures of the best fitting


I don't believe it. It fits


It's hard to see past those giant seam allowances, and I couldn't lift my arm to get a better shot, but I swear it fits perfectly. Wait, let me me put it on again with the seam allowance to the inside.


There is some digging into my waist at the back, but I think that's caused by the boning in the 1 inch seam allowance. When I chalked in a waistline it was right where the seam line is on the pattern. The seam allowance along the neckline will also be gone so that area will look much prettier.

How often does a pattern work as is? Never!

June 4, 2010

this is going to turn into something pretty


I'm waiting for a friend to help fit the mock-up on me. This will eliminate the twisting and looking in a mirror problems I usually have and hopefully make the fitting more accurate.


I'm trying something new this time. With the last pair of stays I altered the pattern, then had to put back in what I took out. This time I sewed the pattern as is with no alterations. I used a 1 inch seam allowance on all the pieces so there is plenty of fabric to make adjustments. Since this bodice laces up the front there will be no gap, that's an inch on each side that I don't have to take away at the waist, so the pattern should work. My biggest worry is how the shoulders will fit.

I have exactly one month to finish this bodice if I want to keep my deadline. Let's hope this fitting goes well.

June 2, 2010

possibly the nicest embroidery hoop ever


A friend of mine said, "Hey, you embroider. I have a hoop I can give you." I had no idea the hoop would look like this.


What a beauty! This is a third hand hoop and can be clamped to a table so one can embroider with two hands free, instead of using one to hold the hoop. I feel I need to up my embroidery game to be worthy of such a nice hoop. Anyone out there use a hoop like this? Any advice on the care and maintenance of the old wood?