Showing posts with label 1844. Show all posts

December 7, 2011

christmas, a couple weeks early


A package arrived today.


When I opened it I found this.


The 1650 bodice! And wrapped in packing paper was this.


The 1925 corselet! There was a reason I couldn't find these, they were still in California! I had planned to take them with me when I drove to my new home across the country, but space was tight in my tiny car and I left a few boxes behind. A shout out to Lisa, the best friend anyone could have, who found this box and sent it my way. Thanks Lisa! I miss you!

The grommets are set in the 1844 corset, it's ready for gore fitting this weekend.


Then I'll tie up the loose ends of the corselet and it can move to the completed pile. That means I should have two finished corsets by the end of the year!

December 1, 2011

progress!


At last I've found some time to pick up the 1844 corset again.


Grommeting begins!

July 29, 2011

problem solved


I received an email suggesting I use a hook to pull a strip of fabric through the layers to add heft for the grommets. Why didn't I think of that? I have a tool for turning sewn tubes of fabric right side out that worked perfectly for this job too. First, I cut a bias strip of coutil, which is sort of the twill tape suggestion on steroids, and pressed it along the center back curve to help guide it to the correct shape.


You can see I doubled the coutil. That may be overkill, but I figured two layers of coutil couldn't hurt since the linen is so light. I hooked one end of the strip on the tool and pulled it through. The pull ring was just small enough to fit between the stitching already done on the back panel.


The groove at the edge of the coutil is where I'll stitch the other channel. Grommets this weekend? I think yes.

July 25, 2011

channels sewn


I finally managed to get the channels for the bones sewn. I sewed 3/8 inch channels on both sides of the seam using a mystery foot that came with my machine as a measuring guide.
Does anyone know what this foot is designed for?


Normally I grade all seam allowances but this time I didn't because I'm using them as bones casings. The seam allowances are 1/2 inch wide and the channels are 3/8 so the bones will sit between 4 layers of fabric. Here's a backlit picture that clearly shows the construction.


The narrow horizontal shadow near the top is the waist tape and the wider vertical shadow is the center front where the busk will be. I made one silly mistake when sewing the channels. I sewed the channels along the center back and realized I forgot to insert another layer of fabric so the grommets have something to grab on to. The linen is so light I'm afraid they'll just fall out without a little more bulk, but now I have very little room to maneuver fabric in that last panel. Has anyone else done this? Any suggestions as to how to solve it?

June 23, 2011

gores quilted


Thank you for your suggestions regarding thread color for the quilting. White it is! I came up with a system so the quilting would be consistent on all four gores. First, I laid the three layers together, interior, filling, and exterior, (which in this case are all the same linen fabric) traced the pattern piece, and stitched the three together on the outline. I wish I would have thought of cutting the filling layer to the exact size before I sewed the layers together. But I didn't, so I trimmed the excess allowance of the filling layer afterwards.


Then I made a template to start the quilting lines. I liked the diamond pattern from the quilting test so I cut a piece of paper to that angle and placed it at the top of the gore as a stitching guide.


Once I had the first X stitched I sewed all the quilting lines in one direction using the presser foot as a spacing guide. Then I sewed the cross lines.


I am so glad I went with white thread because you can see the damask design is still visible depending on how the light falls. I think if I had used colored thread it could have looked too busy.


I need to get those bone channels sewn so I can put this corset on and fit the gores!

June 8, 2011

gore quilting


I've decided to quilt the gores, or godets, whatever your preferred term is. Below is the test quilting.
On the left is the just the two layers of linen stitched together, on the right there is another layer of the same linen sandwiched between the other two layers.


Big difference, right? In addition to looking better that extra layer of fabric on the right helps add a lot of structural support too. So the next steps are, quilting the gores, sewing the bone channels, putting the grommets in for the lacing, inserting the bones, then the final fitting for the bust gores.

I've been worried that this corset will look boring since it will be all white and had considered using a contrasting color thread and bone channels. But now I'm leaning to all white. Thoughts?

May 30, 2011

stitch-in-a-ditch


This always takes so much concentration, but it's worth paying attention and not rushing.

Stitching in the ditch,


and from the other side...


Whew.

May 27, 2011

basted


Basting didn't take nearly as long as it did for the summer corset.


Sorry for the blue photo. I finished just as the sun was setting and didn't want to wait until daylight to take a picture. Tomorrow I'll sew the layers together. Progress!

May 25, 2011

lining the seams up


It was fairly easy to align the seams of the interior and exterior layers, it's keeping them that way when sewing the layers together that's the problem. Here's what I'm doing to keep things in line. I laid the corset flat and pressed my finger on the seam, the allowances for the interior are pressed in one direction and the exterior in the opposite direction so it felt smooth when they lined up, I could feel bulk to one side when the they weren't. I pinned as I went then double checked the alignment by holding the corset to the light.


All good. Just pinning in place has never worked for me when I've tried to sew layers together so the seams all will be basted.


Fortunately this corset doesn't have a crazy number of pieces. Only five more seams to go!

May 23, 2011

putting the layers together


Before sewing the layers together I basted a waist tape to the interior layer.


That is a rather narrow ribbon to be using as a waist tape. I have plenty of wider grosgrain, in a few lovely colors, but the only white ribbon happens to be 1 centimeter wide. It's better than nothing. So, I laid the two layers together face-to-face and stitched together along the center back. After pressing the seam allowances open I flipped the whole thing right side out. Here are the layers mid-flip.


Isn't that gorgeous? Does anyone else see a hint of Georgia O'Keefe in that picture?

May 20, 2011

shaping seam allowance corners


Shaping seam allowance corners really helps when matching the pattern pieces up and it's not difficult to do. Since I add seam allowance when I trace the pattern to the fabric I do the shaping then. First I add 1/2 inch seam allowance.


Then I flip the pattern piece over and trace off the correct angle.


When it's time to assemble the pieces there's no question as to how the pieces should line up, and on seams where the allowances are pressed out they perfectly match the rest of the piece.


Sometimes it's difficult to be sure exactly where seam lines should match up. Shaped seam allowances solves this issue. Since every fraction of an inch can make a difference on a corset I like to be as precise as possible.

May 19, 2011

exterior layer


The exterior layer has been sewn together. Here is how the pattern on the center front matched up.


Not bad. The seam allowances of the interior layer have been pressed to the center front, the seam allowances of the exterior to the center back. Here are the two layers both face down, you can see how the seams match up with the allowances laying in opposite directions.


When I put the two layers together the seam allowances will serve bone casings. This is my least favorite way to assemble a corset, all those seam allowances create a lot of bulk, and it's difficult to get the two layers to match up perfectly, but it's the way that makes sense here. Once the layers are stitched together it will be time to insert the bust gores. I've been wondering if I should quilt the gore layers. Any thoughts?

May 17, 2011

finally sewing the 1844 pattern pieces


Sewing again! Normally sewing wouldn't justify an exclamation point, but it's been too long since I've sat at the machine. The interior pieces of the corset have all been sewn together.


Those sloppy looking pencil marks on the seam allowances will be never be seen when the interior and exterior layers are put together. Plus, since they are just graphite they should wash out, right?

April 20, 2011

bust gore alteration and outer layer cutting


I had one last pattern piece to alter before I could begin cutting. The bust gore. Even though I haven't fit the bust yet I did to the top edge of the corset so I need to add to the gore too. Here is the center front piece altered with a new top edge based on the last fitting, and the too short unaltered gore.


I taped the pattern piece to some paper and lined the hip curve to the edge of the piece so I could continue drafting the curve.


The gore needed an additional 7/8 inch so I measured that distance and connected the dots.


Once the corset is sewn and boned I may find I don't need that much extra at the top edge, but I want to allow for ample fabric when fitting the bust. Making sure the gore is correctly patterned and the pieces correctly cut should make fitting a potentially difficult area easier.

All the pieces have been cut, neatly stacked, and are ready to be assembled. Hooray! Sewing again!

April 11, 2011

fettucini al linen


As I recut the linen corset pieces I ended up a pile of linen ribbons. I thought I should save them, waste not want not and all, so I started dropping them in a bowl.


Once I made the pasta connection I had to put the silverware next to the dish. I did not pull a Charlie Chaplin and take a bite though.

April 9, 2011

finally tracing the 1844 pattern pieces


After unpicking all the seams used for fitting I finally got around to tracing the altered pattern pieces on the fabric.


It felt odd using the mock up as the final fabric. With the lines from the original pattern and the altered version there are marks everywhere. I can't let the traced pieces sit around because if I wait I'll have difficulty remembering which line to cut.


These pieces will become the inside layer of the corset. The next step will be to trace the pattern on to the remaining linen for the outer layer.

It's been a while since I've been able to work on my Corsets & Crinolines corsets. It feels good to be back!

January 18, 2011

from fitting to pattern


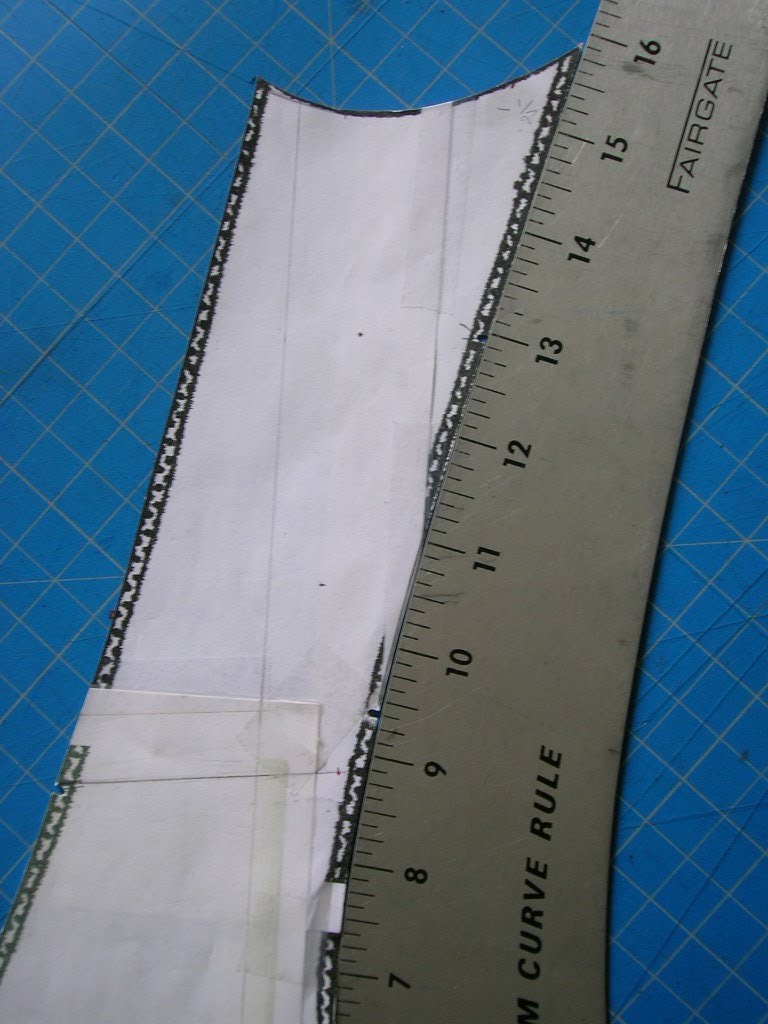
I shimmied into the 1844 corset one more time, pinned away all the excess I could, and marked the waistline. After carefully taking the corset off I measured all the pinned sections and wrote the amounts that needed to be removed from each pattern piece. Then I went to work blending the new points into the pattern's seam lines. To keep those lines nice and smooth and as true to the pattern as possible I lined a hip curve up to the seam line paying attention to the point where the reduction needed to be. Maybe a picture will help.


If you look at the numbers you can see the waist line hits the ruler at 9 1/8 inch, and there is a small red dot 1/4 inch in on the waistline. You can also see a red dot 1/2 inch from the seam line at the top edge of the panel. I need to connect these points. So I line the hip curve to the mark on the waist line at the 9 1/8 inch mark, then pivot the other end until it connects with the mark at the top.


After drawing the new curve in, and doing the same thing for all the other alterations needed, I've got my pattern. Here is it before being cut out, the blue highlighted areas will be trimmed off.


You can also see the waist line, which runs at an angle across two of the panels. Yikes. Thanks Mali, for suggesting a sturdy waist tape. I hadn't even thought of using a waist tape with this corset but I think it will be important so it doesn't stretch.

So now I have to unpick all the seams so I can recut the pieces. Normally I keep track of all seams I rip out, but do these count since I knew I'd be ripping them out?

January 11, 2011

busk solution?


Thanks to all of you who had some busk solution suggestions for me. A few of you suggested a spoon busk may solve my fitting problems. That's a good idea, but the spoon busk wasn't invented until 1873, so I feel like I'll disturb the time space continuum if use a busk from the future on my 1844 corset. I realize I've already done that by using a 1950's sewing machine, but you get the point. And since this corset is illustrated without a two piece busk I want to make it without one. I tried on the mock up one more time, and I took two regular busks and slid them in the bias tape pocket.


Better. So maybe just a 1 inch wide steel down the front will be the answer. There is still plenty of fitting to be done, but this looks the right direction. I think what I should do now is sew the alterations in, take the bias tape out of the center of the panels, and put the bones on the seam where they should be. This should give me a more accurate fit and I need to see the fit improvement because this corset is looking dumpy right now, and a corset should never look dumpy!

January 7, 2011

1844 fitting round 2


I decided to pin the godets in place so I could do the second fitting without fabric flopping open.


Then I tried on the mock up. It turns out that pretty hourglass shape I liked from the first fitting was the result of excess fabric.


Too bad. It looks like I pinned out a little too much from the top near the shoulder blade. But other than that the back looks OK. Now from the front.


I can see I need to blend the reduction at the side hip all the way to the waist to give a smoother line. And there still is a gap at the bottom that is even more visible from the side.


Maybe removing some from from the bottom of the second panel and blending to the waist will help? Maybe standing straighter? I'd swear I was standing straight, but clearly I'm not. I also think that the busk I'm using is too rigid. The illustration in Corsets and Crinolines shows a slight indentation at the waist. By drawing a line on a piece of vellum and laying it over the drawing of the corset it's easy to see.


The busk on mine makes such a hard line that it pulls out from the waist. That shouldn't be, right? Any suggestions?

January 5, 2011

1844 fitting


Warning. Fitting this corset without the godets at the bust is not pretty.


Oh my. I had to cut the fabric at the bust to get the corset to sit properly, I only imagine it would have looked worse if I had cut the space for both gores. But I can see the shape of the corset starting to show, and I think it will make a very nice silhouette once the alterations are made so it fits correctly. Here's how it looks from the back.


Not too bad. Very Man Ray Violin d'Ingres don't you think? And if you look past the giant seam allowance near the lacing you can see a nice curve along the center back.


I've pinned away the excess across the belly, and a little bit at the side seam near the top. I don't think I'll need the extra inch I added at the top and bottom edges, but I'll wait until I've sewn the alterations and start to fit the bust gores before I make that call.

I was second guessing my fabric choice as I was sewing. It was so floppy it just didn't seem possible that linen napkins could get the job done. But after trying it on I believe using two layers will work fine. Plus, the linen should make this corset super comfortable in Summer weather. It felt cold when I put it on, cool air came right through the t-shirt I had on. Has anyone else made a linen corset and experienced this?