November 30, 2009

best grommet setting yet


Did I say I was going to "knock this corset out" over the weekend? I don't know what I was thinking. I never just knock corsets out. I did get the lacing panels sewn. They were assembled the same way the side panels were, attached at the top, allowances graded, panels folded and basted in place, then stitched. I laid a half inch wide strip of coutil down the center so the grommets have something to hold on to before I sewed the channels. And I set the grommets on one side.


Not a single grommet split or wobbly. Everything was going so well I was afraid I'd screw up if I just kept setting. So I took a break after finishing the one side and cut and tipped all the bones with Plasti Dip the same way I trimmed the busk 1904 corset. Here they are drying. 


And in case you noticed, those are gold (OK brass) grommets, which means there will be a gold busk. I can't say it any better than Achille Castiglioni, "Cinc ghei pusseé, ma luster." 

November 28, 2009

ribbon channels sewn


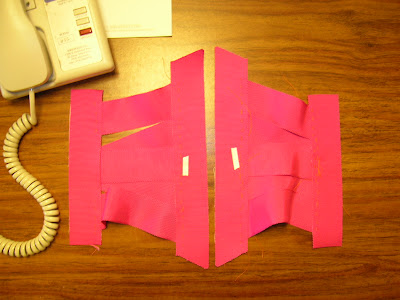
While roasting a leftover turkey carcass to make soup stock I was able to get some sewing done. The top of the side panels were sewn together, then the top and bottom seam allowances were pressed and graded. Here is the corset before I flipped it to sew the channels. The front is wrong side out, with the center front in the center, and the the back is face up.


The 1 1/2 inch wide ribbon has just enough width to fit four 5/16 inch wide channels. So after the side panels were basted together I sewed down the center of ribbon, measured and marked 5/16 inch with removable artist's tape, and sewed.


It's looking like a corset! This ribbon corset already looks neater than it's 1904 cousin. If I don't screw up the grommets it may stay that way. 

November 25, 2009

last pictures from the road


I originally thought I'd sew up two widths of ribbon, laying one over the other, on the sides to make the full 2 inches of the pattern. Like this.


But that's not pretty. Then I realized if I used one 1 1/2 inch ribbon width at the sides, instead of combining two to make it wider, and used the full 1 1/2 inches at the front busk and back lacing, I'd gain some of that width back. In fact, the finished corset will be a bit wider than the pattern because the front and back panels aren't 1 1/2 inches wide, but that's OK. A ribbon corset isn't design to cinch several inches off the waist, so an extra half inch won't make a difference.

I laid the two halves together, face-to-face, basted the top edge of the side ribbons together, and flipped so the right side is out.


I could continue sewing by hand, but I've arrived home and my sewing machine is calling me. I hope to knock this ribbon corset out over the Thanksgiving weekend so I can get back to work on the 1925 corselet I left behind. It hasn't been forgotten!

November 18, 2009

sacrificing ribbon for safety


What to do when someone rear ends your vehicle? Fix it enough to keep going.


No one was injured, and fortunately I had my Ziplock with ribbon corsetting supplies and was able to craft an emergency tail light patch. Just call me Jo MacGyver.

November 16, 2009

ribbon corset at a wigwam


The ribbons are all basted in place.


The section on the upper left side is the front of the corset, the lower right is the back. The next step will be connecting the side panels.

In case anyone is interested, this photo was taken at The Wigwam Motel in Holbrook Arizona. Roadside America at it's finest.

November 13, 2009

A bit of progress


I managed to get a bit of basting done at a Best Western.

November 11, 2009

what have i gotten myself into


Making a ribbon corset on the road was a crazy idea. The fiddly-ness of building a corset is magnified when done in a strange environment.

I cut the cotton interfacing into 1 1/2 wide strips, made an ironing board out of a wooden cutting board and three linen dish towels, and fused the interfacing to the ribbon. Then I cut out the pieces. The pieces that aren't the full width of the ribbon were lined up straight, then cut.


I penciled in notch marks.


The work surface above is an ARTnews on the floor. By time I started putting the ribbons in place I was able to work on a dining room table. I marked the seam allowances with removable artist's tape, then basted the ribbons in place.


The ribbons are basted along the center back of one side. That's it. It's slow going and I have no idea what my next work surface will be. I'm wondering if I should have brought some embroidery to work on instead.

November 9, 2009

detour


I'm going to be on the road for a couple of weeks, so I thought I'd pack a small project to work on without a sewing machine. 


That Ziplock bag contains a ribbon corset-to-be. I'm using the pattern for the 1904 light corset for sport or negligé wear, but this time I'm making it out of ribbon. The side, busk, and lacing, panels will be backed with cotton batiste, but there will be no coutil, or other heavier fabric on this one. Here's a close up of the 1 1/2 inch wide, cotton, petersham ribbon.


I could have chosen just about any color, but I went with the same fuchsia as the 1904 corset so a direct comparison between the two can be made. The plan is to hand sew as much as I can so when I return home I'll be ready to insert the busk and set the grommets. Wish me luck.

November 6, 2009

the art of the embroiderer


Looking for something to do in Kent, Ohio? Check out The Art of the Embroiderer at the Kent State University Museum.

© The Kent State University Museum

There are embroidered garments from around the world that will blow you away. Even if you can't see the exhibit in person, there are plenty of images at the Museum's website. It's not the same, but still a great resource. Photography is not allowed, but without special permission it's not possible to take better pictures than what is already available online.

And if that is not enough, there is also an exhibit, Gazette du Bon Ton, displaying pages from the French magazine along with gowns from the era, sometimes the exact gowns in the illustrations. So many pretty things.

The Art of the Embroiderer runs through December 31, 2009, and Gazette du Bon Ton runs through May 30, 2010. Go!

November 4, 2009

corselet fabric and garter grips


I broke down and bought fabric. 


It's a silk and rayon blend brocade. I love the chocolate and black colors, and the pheasant motif is most pleasing. The smooth brocade feels right for the corselet, since I want a slick fabric so a light, 20's flapper's dress will glide over it. I could probably use this fabric on it's own, it's feels heavy enough to do the job of a thin cotton broché, but I think I should back it with a lightweight batiste. Not for strength so much as for cleanliness. It seems wise to have a layer of cotton against the skin instead of the brocade. I don't think I'll fuse them together, just flatline. 

I also have the garter clips and grips.


I ordered these from Lara Corsets ebay shop. Yea, 1 5/8 inch garter grips.

I still have to do one more fitting with the mock-up to fit the gores, but then I can cut into my pretty new fabric!

November 2, 2009

gore raising


I ripped out the hip gores, bumped them up an inch, and pinned the mock-up on. The waist wrinkles were smaller, but still there. Raised the gores another 1/2 inch and put the mock-up on one more time.


At last. The gores need to be lengthened and reshaped since the corselet is now loose across the backside, but I think the big fitting issue has been solved. 

Question. Should I be concerned the way the grain angles on the side panel? It's straight at the bust where it's snug, but below the waist it angles to the front. What to do?