
Oh no!
Oh no! After over five years of wonderful service my laptop has died. I knew it was coming. It doesn't make it any easier. Hopefully this won't cause a huge disruption in my already sproradic posting, but I thought I warn you in case there is a gap. I'll be back soon!
January 21, 2011
January 18, 2011
from fitting to pattern
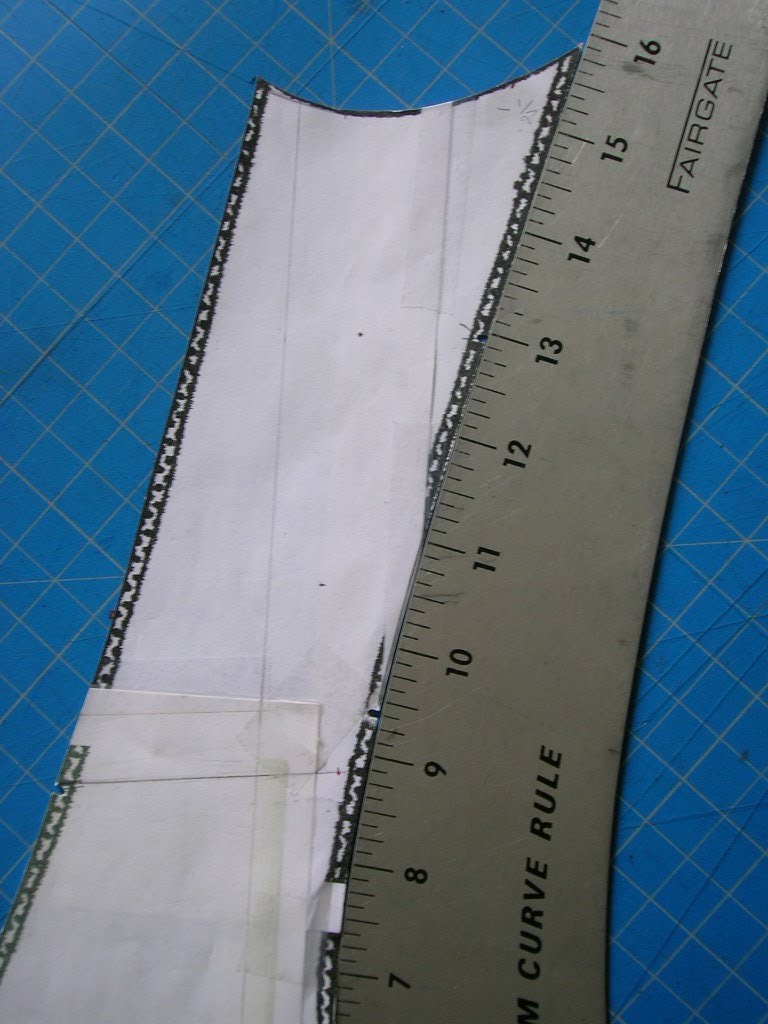
If you look at the numbers you can see the waist line hits the ruler at 9 1/8 inch, and there is a small red dot 1/4 inch in on the waistline. You can also see a red dot 1/2 inch from the seam line at the top edge of the panel. I need to connect these points. So I line the hip curve to the mark on the waist line at the 9 1/8 inch mark, then pivot the other end until it connects with the mark at the top.

After drawing the new curve in, and doing the same thing for all the other alterations needed, I've got my pattern. Here is it before being cut out, the blue highlighted areas will be trimmed off.

You can also see the waist line, which runs at an angle across two of the panels. Yikes. Thanks Mali, for suggesting a sturdy waist tape. I hadn't even thought of using a waist tape with this corset but I think it will be important so it doesn't stretch.
So now I have to unpick all the seams so I can recut the pieces. Normally I keep track of all seams I rip out, but do these count since I knew I'd be ripping them out?
January 11, 2011
busk solution?
Thanks to all of you who had some busk solution suggestions for me. A few of you suggested a spoon busk may solve my fitting problems. That's a good idea, but the spoon busk wasn't invented until 1873, so I feel like I'll disturb the time space continuum if use a busk from the future on my 1844 corset. I realize I've already done that by using a 1950's sewing machine, but you get the point. And since this corset is illustrated without a two piece busk I want to make it without one. I tried on the mock up one more time, and I took two regular busks and slid them in the bias tape pocket.

Better. So maybe just a 1 inch wide steel down the front will be the answer. There is still plenty of fitting to be done, but this looks the right direction. I think what I should do now is sew the alterations in, take the bias tape out of the center of the panels, and put the bones on the seam where they should be. This should give me a more accurate fit and I need to see the fit improvement because this corset is looking dumpy right now, and a corset should never look dumpy!
January 7, 2011
1844 fitting round 2

Then I tried on the mock up. It turns out that pretty hourglass shape I liked from the first fitting was the result of excess fabric.

Too bad. It looks like I pinned out a little too much from the top near the shoulder blade. But other than that the back looks OK. Now from the front.

I can see I need to blend the reduction at the side hip all the way to the waist to give a smoother line. And there still is a gap at the bottom that is even more visible from the side.

Maybe removing some from from the bottom of the second panel and blending to the waist will help? Maybe standing straighter? I'd swear I was standing straight, but clearly I'm not. I also think that the busk I'm using is too rigid. The illustration in Corsets and Crinolines shows a slight indentation at the waist. By drawing a line on a piece of vellum and laying it over the drawing of the corset it's easy to see.

The busk on mine makes such a hard line that it pulls out from the waist. That shouldn't be, right? Any suggestions?
January 5, 2011
1844 fitting

Oh my. I had to cut the fabric at the bust to get the corset to sit properly, I only imagine it would have looked worse if I had cut the space for both gores. But I can see the shape of the corset starting to show, and I think it will make a very nice silhouette once the alterations are made so it fits correctly. Here's how it looks from the back.

Not too bad. Very Man Ray Violin d'Ingres don't you think? And if you look past the giant seam allowance near the lacing you can see a nice curve along the center back.

I've pinned away the excess across the belly, and a little bit at the side seam near the top. I don't think I'll need the extra inch I added at the top and bottom edges, but I'll wait until I've sewn the alterations and start to fit the bust gores before I make that call.
I was second guessing my fabric choice as I was sewing. It was so floppy it just didn't seem possible that linen napkins could get the job done. But after trying it on I believe using two layers will work fine. Plus, the linen should make this corset super comfortable in Summer weather. It felt cold when I put it on, cool air came right through the t-shirt I had on. Has anyone else made a linen corset and experienced this?
Subscribe to:
Posts (Atom)


