December 30, 2009

to be cleaned


I can not blame the cat. It's my own fault for not storing the summer corset properly. After the last wearing I aired it out and laid it in a box. I did not put the cover on the box and nothing makes a better bed for a cat than a low sided box. As I was pulling out the 1925 corselet mock-up (which was in a see through plastic container with a lid) I stumbled across this.


In the picture it looks like just a loose layer of dust that can be brushed off, but there is ground in grime across the entire front of the corset. So, cleaning. The section about cleaning in my 1921 copy of Corsets and Close Fitting Patterns published by the Women's Institute of Domestic Arts & Sciences says to lay the corset on a clean table or in a wash tub and scrub with a brush and hot soap suds. After scrubbing it should be rinsed several times then pulled and stretched lengthwise to remove wrinkles. It should then be hung in the sun and when almost dry it should be worn for a few minutes to to stretch it to the correct shape. Then rehung to dry completely. 

I like the technique of putting the corset on when damp to give it the correct shape. But scrubbing? I'm nervous about scrubbing the corset. Maybe sponging would be better. I'd given this corset a light wash before, but now it needs a real cleaning. If anyone has any tips that can help I would love to hear them, otherwise I'll just wait until there is a sunny day and get to work. 

December 27, 2009

fuchsia ribbon corset on a body


I'm always saying the most recent corset I finish is my favorite, but it's only because it's true.


Maybe it's because I can see what I've learned, or because my skills are improving, or because I feel the fit is better each time. But really, this is my new favorite. Normally I rip into whatever I've just made with criticisms, but I'm pretty happy with this one. It's as close to perfect as I've hit yet. I'll admit, I was worried about putting it on. The ribbons were so light and floppy I was concerned they'd be loose and uneven when it was on. But nope. It fit just like it was supposed to. And I love the gold flossing. It's just the right amount of color. OK, I'll quit crowing and get on to a view of the back.


I wasn't aware I'd laced slightly unevenly until I saw the pictures. No matter. When compared to the first version of the 1904 pattern the differences are clear. Steel along the grommets instead of plastic kept the center back edges straighter, and 10 grommets to a side instead of 8 looks nicer, as does the thinner ribbon. Steel boning at the sides instead of plastic makes a small difference in the curve at the waist. That may change if I wear this more and the steels become more broken into my shape. We'll see. I would not lace this corset any tighter though. It felt about right here, and aside from additional stress on the petersham ribbon, I think lacing tighter would start to look weird and too pinched at the waist. Already the ribbon takes the shape of my body way more than a corset of heavier fabric and more boning. Look how it curves around my ribs and over my belly in the top picture. That's probably exactly why it was something more comfortable to wear at night.

This small project for the road turned into a almost two month diversion from the main project. I promise the 1904 pattern will be the only one I make twice. Now back to the 1925 corselet!

December 25, 2009

December 23, 2009

ribbon corset done


It's finished!


I was having problems with the light so the above image is soft. Here's one with a bit more detail.


And here is a close up of the flossing. The top row is the interior of the corset, the bottom the exterior.


I have gold ribbon for the lacing and will snap a picture of it on as soon as possible. Until then, the statistics.

7 yards - rayon 1 1/2 inch wide petersham ribbon
5 yards - 1/4 inch wide double face satin ribbon
1/4 yard - cotton batiste (fusible)
1 spool - cotton thread
1 spool - silk thread
20 - double zero brass grommets
1 - 11 inch gold busk (trimmed to 7 3/4 inches)
84 inches - steel boning

number of seams picked out - zero     That's right, zero!

December 21, 2009

better than black


After reading the comments to the last post I thought I had my mind made up, fuchsia flossing. Just to be certain I thought I'd test the three different fuchsias I had, along with black too. I did the sample, and when I went to put the non-chosen threads away I saw this.


Gold silk. Perfect with the gold busk and grommets. I embroidered a sample and it lit up against the pink. Hands down the winner.


What's the fairy tale where straw is spun into gold? I'm sure this is what that gold thread would have been like. Stitching with it is like working with slippery air. I'm using 8 threads through the needle to get a nice thread density, but I think its worth the hassle. I can't wait to see the corset finished!

December 18, 2009

flossing question


The second ribbon has been sewn along the busk.


They blend in nicely. I'm quite happy with this solution. Then the boning was slipped in.


I cut the bones to leave 1/4 inch at the top and bottom of each channel, but it's tighter than that. Here a pin marks the end of the boning.


Including seam allowances there are four layers of fabric at each end, but since it's just ribbon fused with batiste it's not that heavy. I feel like flossing is important to prevent poke through. I was going to go with the top design from this sampler.


But I'm thinking of changing the color to the same fuschia as the ribbon because the orange needs a bit more space visually. More than is on the sample. At least I think so. Your 2¢?

December 17, 2009

14 stitches per inch


I sewed the ribbon along the busk by hand. I figured I was going to have to baste anyway, so why not. 


I just folded the top edge of the ribbon under and used a back stitch. If you look closely at the top of the right vertical ribbon you can make out the fold. I measured my stitches afterward and they came out to 14 per inch. Probably a bit smaller than needed to do the job, but I'm very happy with how they look. Tonight I'll do the ribbon along the other side then it will be on to flossing. Really.

December 16, 2009

avoidance


I found something else to do while mulling over the ribbons along the busk issue. Tie and tuck all loose threads. After the threads were knotted I threaded them through a needle and pulled the thread into the channels. Before.


After.


Not exciting, but necessary. And made much easier with this.


Dritz Quilting Needle Pullers. Once you've pushed the needle through several layers of fabric it can be tough to grasp and pull out. Or at least it is for me. No more. 

Alright, I can't avoid it any longer, back to the busk.

December 10, 2009

busk inserted and a new issue


It's never as easy as I think it should be. The busk is in. I followed pretty much the same steps I did to insert the other side. Attach the facing to the front panel, then fold and baste the ends. Here is a good picture of the folded and basted ends.


See how the back facing is folded so it's slightly shorter than the front so it won't show? After everything was folded and basted in place I stitched 1/16 from the center front edge then marked where the studs will come through the fabric.


I used an awl to make the holes for the studs, pushed them through, and sewed the busk in place. 


And there is the new problem. Can you see it? The center point isn't as perfect as I'd like it to be, but that's not it. It's that seam at the edge of the ribbon. There is 6mm space between seams on the left side, but maybe just 4 on the right. Yuck. It's even more visible when you look at more of the busk.


I thought I had allowed a bit of extra fabric for that small 1/16 seam at the center front so I wouldn't have this exact problem. I guess I didn't. I do have a possible solution though.

If I run a thin piece of ribbon along the edge of the loop side, and bump it just over the edge on the stud side, I balance the difference out. Plus, I'll have an extra seam securing the horizontal ribbons in place. Thoughts?

December 8, 2009

fold, press, baste, trim, fold, baste, sew


With no bias trim to finish the top edge it's important that I make the center at the top point super clean and neat. I also realized if I sewed a regular seam with a 1/2 inch seam allowance at the busk the corset will be the exact size of the pattern, not larger as I originally thought. I placed the back facing so it would overlap the front panel by 1/8 inch to make sure it there'd be enough fabric to catch when I sewed from the front. I marked my stitching line and the spaces to leave for the busk loops.


After I sewed the pieces together the top edges were folded down and pressed, then basted so they would not shift or come untucked. I made sure when folding that the back piece was folded a little lower than the front so there was no chance it would show. After they were secure I trimmed the excess seam allowance off. Then I folded the back panel back and basted the top edge together. Here it is seen from the inside of the corset.


I did the same for the bottom, except that I slid the busk in place before basting the bottom edge closed. I sewed along the busk, and along the edge of the ribbon, removed the basting, and voila.


Pretty crisp. Now I just need to make the edges of the stud side match and I'm ready for flossing!

December 4, 2009

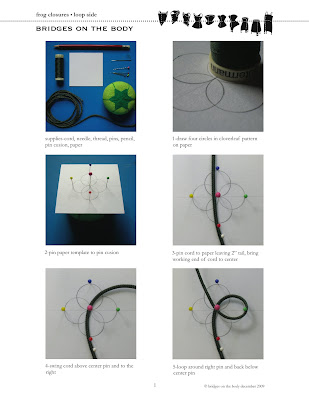
frog closure how to


Here it is. The Chinese frog closure tutorial. The instructions are broken down into 5 jpegs, 1mb each, and each jpeg is an 8 x 11 image.


Here is what the finished frogs will look like.


My closures went on a dress, but they can be used for many projects. If you use these instructions to tie your own frog buttons send me a picture of them. I'd love to see how they turn out!

December 1, 2009

a busk and a confession


First the confession. Let's revisit my sewing rule.


I broke that rule. I bought a pattern without having any usable fabric in the stash for it. I am only adding to the backlog of patterns that may never be sewn. I have been able to browse through patterns with no problem, but this time I couldn't help myself. I was powerless to the Siren's call of Polynesian Pattern #191.


I have two vintage dresses from Hawaii cut like this, they are very flattering, and with their pleated trains festive without being over the top. I could probably make a pattern from them, but when the Polynesian Pattern company has already done the work for me I'd be foolish not to snap it up. Plus it was only $7 and by purchasing it I'm supporting a great local shop, Meow. Have I rationalized enough? Someday I'll find the perfect Marimekko fabric and it will be sewn.

OK. Now that I've confessed my sins, on to ribbon corset items. In addition to testing flossing designs I trimmed the busk so it angles at the top instead of being rounded.


I don't know if it will make a big difference, but it seems like it should help support the point at the center front. We'll see.

November 30, 2009

best grommet setting yet


Did I say I was going to "knock this corset out" over the weekend? I don't know what I was thinking. I never just knock corsets out. I did get the lacing panels sewn. They were assembled the same way the side panels were, attached at the top, allowances graded, panels folded and basted in place, then stitched. I laid a half inch wide strip of coutil down the center so the grommets have something to hold on to before I sewed the channels. And I set the grommets on one side.


Not a single grommet split or wobbly. Everything was going so well I was afraid I'd screw up if I just kept setting. So I took a break after finishing the one side and cut and tipped all the bones with Plasti Dip the same way I trimmed the busk 1904 corset. Here they are drying. 


And in case you noticed, those are gold (OK brass) grommets, which means there will be a gold busk. I can't say it any better than Achille Castiglioni, "Cinc ghei pusseĂ©, ma luster." 

November 28, 2009

ribbon channels sewn


While roasting a leftover turkey carcass to make soup stock I was able to get some sewing done. The top of the side panels were sewn together, then the top and bottom seam allowances were pressed and graded. Here is the corset before I flipped it to sew the channels. The front is wrong side out, with the center front in the center, and the the back is face up.


The 1 1/2 inch wide ribbon has just enough width to fit four 5/16 inch wide channels. So after the side panels were basted together I sewed down the center of ribbon, measured and marked 5/16 inch with removable artist's tape, and sewed.


It's looking like a corset! This ribbon corset already looks neater than it's 1904 cousin. If I don't screw up the grommets it may stay that way. 

November 25, 2009

last pictures from the road


I originally thought I'd sew up two widths of ribbon, laying one over the other, on the sides to make the full 2 inches of the pattern. Like this.


But that's not pretty. Then I realized if I used one 1 1/2 inch ribbon width at the sides, instead of combining two to make it wider, and used the full 1 1/2 inches at the front busk and back lacing, I'd gain some of that width back. In fact, the finished corset will be a bit wider than the pattern because the front and back panels aren't 1 1/2 inches wide, but that's OK. A ribbon corset isn't design to cinch several inches off the waist, so an extra half inch won't make a difference.

I laid the two halves together, face-to-face, basted the top edge of the side ribbons together, and flipped so the right side is out.


I could continue sewing by hand, but I've arrived home and my sewing machine is calling me. I hope to knock this ribbon corset out over the Thanksgiving weekend so I can get back to work on the 1925 corselet I left behind. It hasn't been forgotten!

November 18, 2009

sacrificing ribbon for safety


What to do when someone rear ends your vehicle? Fix it enough to keep going.


No one was injured, and fortunately I had my Ziplock with ribbon corsetting supplies and was able to craft an emergency tail light patch. Just call me Jo MacGyver.

November 16, 2009

ribbon corset at a wigwam


The ribbons are all basted in place.


The section on the upper left side is the front of the corset, the lower right is the back. The next step will be connecting the side panels.

In case anyone is interested, this photo was taken at The Wigwam Motel in Holbrook Arizona. Roadside America at it's finest.

November 13, 2009

A bit of progress


I managed to get a bit of basting done at a Best Western.

November 11, 2009

what have i gotten myself into


Making a ribbon corset on the road was a crazy idea. The fiddly-ness of building a corset is magnified when done in a strange environment.

I cut the cotton interfacing into 1 1/2 wide strips, made an ironing board out of a wooden cutting board and three linen dish towels, and fused the interfacing to the ribbon. Then I cut out the pieces. The pieces that aren't the full width of the ribbon were lined up straight, then cut.


I penciled in notch marks.


The work surface above is an ARTnews on the floor. By time I started putting the ribbons in place I was able to work on a dining room table. I marked the seam allowances with removable artist's tape, then basted the ribbons in place.


The ribbons are basted along the center back of one side. That's it. It's slow going and I have no idea what my next work surface will be. I'm wondering if I should have brought some embroidery to work on instead.

November 9, 2009

detour


I'm going to be on the road for a couple of weeks, so I thought I'd pack a small project to work on without a sewing machine. 


That Ziplock bag contains a ribbon corset-to-be. I'm using the pattern for the 1904 light corset for sport or negligé wear, but this time I'm making it out of ribbon. The side, busk, and lacing, panels will be backed with cotton batiste, but there will be no coutil, or other heavier fabric on this one. Here's a close up of the 1 1/2 inch wide, cotton, petersham ribbon.


I could have chosen just about any color, but I went with the same fuchsia as the 1904 corset so a direct comparison between the two can be made. The plan is to hand sew as much as I can so when I return home I'll be ready to insert the busk and set the grommets. Wish me luck.

November 6, 2009

the art of the embroiderer


Looking for something to do in Kent, Ohio? Check out The Art of the Embroiderer at the Kent State University Museum.

© The Kent State University Museum

There are embroidered garments from around the world that will blow you away. Even if you can't see the exhibit in person, there are plenty of images at the Museum's website. It's not the same, but still a great resource. Photography is not allowed, but without special permission it's not possible to take better pictures than what is already available online.

And if that is not enough, there is also an exhibit, Gazette du Bon Ton, displaying pages from the French magazine along with gowns from the era, sometimes the exact gowns in the illustrations. So many pretty things.

The Art of the Embroiderer runs through December 31, 2009, and Gazette du Bon Ton runs through May 30, 2010. Go!