April 30, 2009
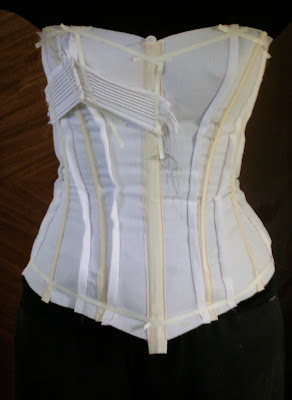
cane boning

April 27, 2009
another try-on

The alterations I made at the hips and the bust helped the fit. I'm not sure if adding at the top edge was necessary though. I think what I need to do is drop the point at the center front instead. I didn't add anything at the center, but because of the curve around the bust the bit I did add didn't create the nice angle that I was after. I've marked the top and bottom edges with tape, and positioned the cording.

I'm happy with the shape. It takes a little imagination, but I think I'll be able to achieve the smooth, elongated, torso seen on the fashion plates from this era. Yea.

illustration from La Mode Illustree´1888
April 26, 2009
everything that can go wrong
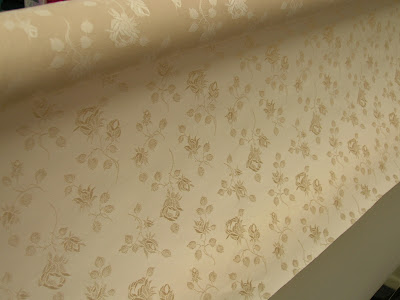
• After laying the pieces out, and all were present and accounted for, one piece went AWOL. Where did it go? Who knows? After a thorough search of the house and the garage no piece turned up. Fortunately, there was enough adia cloth to cut another piece, but there is no more should another piece go missing.
• I thought I measured every pattern edge to make sure the seam lines were the same length. I discovered when pinning the pieces 2 and 3 together I did not. There was almost a 3/8 inch difference between the two. With no more fabric to cut new pieces from I pinned from the waist up, leaving the excess at the top, (The edges from the waist down were the same length.) and will reshape the top edge once the corset is tried on.
• I discover as I’m lacing myself in that I sewed one of the lacing strips over the seam on the piece next to it. So I must pick out the stitching. (Thankfully it was basted in, not sewn at 12-14 stitches per inch.) This involves hunching over a twisted-around-the-body, laced corset. After pinning the lacing strip in place I forge ahead.
• I twist the corset back so it sits properly and realize I forgot to baste bone channels on. The whole contraption is crunchy and wrinkling, and it’s impossible to tell whether it fits well or not.
• I grab the camera to document the ill fitting monstrosity and after one out of focus shot the battery dies.
• Frustrated and hungry, I manage to tangle the lacing in a knot, and break into a nervous sweat as I think this is my own private Hell and I’ll be stuck twisting in this fabric cage for eternity.
• A deep breath later I manage to untie the knot. I take the corset off, and as I set it down I see my cat has been sitting on the corded pieces, leaving a spot of dirt on one.
It's at this point I decided vodka was the solution to my problems and poured a shot of Grey Goose over watermelon granita I'd made the night before. Tomorrow I'll sew again.
April 24, 2009
cording fear
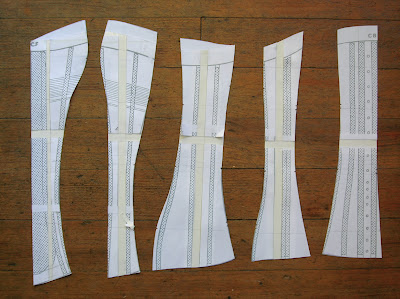
My solution? Make a corded patch and apply it to the mesh before I sew the pieces together. I started by transferring the cording placement from the mock-up to the pattern.

Each section matched up at the seam line, but they were not the same height overall, one side was 1 5/8 inches from top to bottom, the other was 1 7/8. When I drew them each at 1 3/4 inches the edges didn’t match because of the angle. Stupid geometry.

I need the same distance because of the cording. If it were just fabric I wouldn’t stress, but a couple extra rows of cording on one side will be too noticeable. I decided to make each piece 1 3/4 inches and will tuck the edges under a little more on one side, and a little less on the other, when I sew them on. Here are the finished pattern pieces.

I cut a piece from coutil. This will be the back of the cording. I sewed it near the top edge to a larger piece of unpatterned coutil, wrong side to wrong side, leaving extra on the larger piece to fold over later.

The first line is sewn with red because I will stitch right on this line with the proper color when I attach the appliqué to the corset, and I’ll remove the red thread once everything is secure. After sewing this first line I got nervous about keeping my stitching straight so I sewed some test cording. It helped. With my confidence buoyed, I went back to the real cording. I flipped the piece I'd sewn over, laid a piece of cotton string snuggly between the pieces of fabric, and sewed right against the string. I did this for every cord.

The red thread was used again at the bottom. The edges were turned under, pressed, then I traced the pattern piece onto the finished piece.

I’ll trim the excess from the ends and repeat the whole process three more times. When I saw these pictures I realized my thread tension is off, I can see the thread from the bobbin at each stitch. Not pretty. But if I fix it now I’ll have one piece that doesn’t match the others. Maybe I’ll sew all the cording with the tension off so they look the same, then fix the tension. Or maybe there will be enough coutil scraps that I can redo this entire piece. Stupid thread tension.
April 23, 2009
cording test

The cotton string is a consistent width, stays twisted so it was easy to work with, and added heft without being too stiff. The twine varied too much in width making it difficult to sew a straight line against, and even though it was thinner than the string the corded section was much stiffer. The mystery yarn separated into threads and kept flattening out, making it hard to sew against.
The cotton string wins.
April 22, 2009
color decided
Thinking that contrast stitching would liven up the cording at the bust, I realized I had to choose the flossing color so I could make the contrast thread match. Before I ran out to buy anything I looked into the bin of embroidery floss to see what I had. I liked the suggestion that I should show off the embroidery by going black, but surprisingly, I had no black thread. I did however find DMC 844, a warm dark grey. Grey it is. And I have a spool of thread that's the same color. What luck!

April 21, 2009
fabric cut

I added 1/2 inch seam allowance to the side of each piece, except the center back because I'll be attaching a lacing strip there. The top and bottom edges have no seam allowance. Here are the pieces, ready to go.

I was nervous the adia cloth might be too whimpy for a corset, but it felt pretty sturdy as I was cutting. Good.
Next up, the cording.
April 20, 2009
waist belt and cording placement

I also realized I forgot to mark where the cording under the bust will fall. I’ve marked mine in at a sharper angle than the cording on Norah Waugh’s pattern. A few reasons; I’ve changed the angle of the top edge and I want the cording to follow that angle. I also think the stronger angle is more pleasing to the eye, directing it upward, rather than across, as a shallower angle will do. And last, the cording is there to support to the bust. It seems structurally that an angle will provide more support that something straight across, which is how the cording often is on this style of corset. There is a pale blue one in the Kyoto Costume Institute’s digital archive that has the same cording (This could be quilting instead of cording, it’s hard to tell on this picture, but the general design is the same.) and the angle is almost nonexistent.
Both the waist belt and the cording fabric will be separate pieces so I have room to change them before I sew them on. The cording will be done on a piece of fabric that is parallel top and bottom, it will be easy to add. I'm not sure about the waist belt though. I may be in over my head with this piece.
April 17, 2009
supply run

And there are patterns, and tons of corsets for sale, and interesting things like this.

Not to mention the beautiful fabrics.

You know the feeling when you've got an idea, and because you haven't started yet you haven't made any mistakes, so you're just filled with enthusiasm, and you walk into the place that is going to provide you with supplies to make your great idea happen so all is right with the world? Farthingales.
Anyway, I picked up a spoon busk, tips for spiral boning, bone casing, and some spring steel. Once I cut down that busk I realized I don't have to purchase the boning pre-cut. I can cut it to whatever length I want. I have the power.

O.K. Time to get back to work.
April 15, 2009
the finished pattern
Thanks so much to everyone who gave me flossing color suggestions. You've got me thinking.

Instead of trimming the bottom edge as marked during the fitting I decided to I leave it as is and shape it up when I do a final fitting.

I feel confident enough that I'm not going to sew a second mock-up. I probably should since I added at the bust. But I'm thinking fitting issues will be minor, and fixable by just taking in, or letting out, a small amount at a seam line. Hopefully.
April 13, 2009
design questions

The Eiffel Tower site is great, there are tons of pictures and drawings to use as reference. I love looking at all those Xs supporting the structure, so I think the flossing design will be Xs of different sizes and weights. Xs are also simple enough that I should be able to handle them with my beginner embroidery skills.
I’m also wondering how to tackle the waist tape issue. Normally, the waist tape is stitched inside around the waist to add strength the area where the most stress on the garment is, and to prevent any stretching of the fabric. But because of the mesh fabric the waist tape will be visible and a straight white band around the middle isn’t the most pleasing to the eye. It will just cut me in half. Look at how elegant the red belt around the waist is on this corset from the The Symington Collection.

© Leicestershire County Council: The Symington Collection
They also have a ventilated corset cut similarly to the pattern I'm working with, and the exposed waist area is that same inverted triangle shape.

© Leicestershire County Council: The Symington Collection
And that corset is boned with cane instead of the usual steel. Something else to consider. While I'm mulling over using cane please give me some color suggestions for the flossing.
April 12, 2009
flossing
April 9, 2009
fitting

There is some wrinkling, but since it looks pretty even and is all horizontal I think it’s from using thin muslin and not having the boning secured at the ends so the fabric is sliding. I think. It could be that the extra half inch I added between the waist and the underbust to lengthen the torso is too much. Here’s an out of focus side view.

And an even more out of focus back view.

I am so glad I added to the top edge of the original pattern. I'd be a goner if I hadn't. Still, I felt I needed more coverage. After I pinned the excess fabric at the seams, I pinned muslin to the mock-up and drew in a new top edge.

I also marked a new bottom edge, taking about an inch off. I'll make all the changes to the pattern and then it's time to cut the real fabric. Yea.
April 8, 2009
mocking up

Mock-ups need boning too so I made boning channels by sewing bias tape where the boning will be before putting the pieces together.

A couple of lacing strips on the center back and twill tape around the waist and I'm ready to slide some bones in and try it on.

April 7, 2009
comments and suggestions
Thanks again for following along as I work on this project!
April 5, 2009
drafting the pattern

The waistline will be the smallest measurement across the pattern. I drew several lines straight across where I thought the waist might fall, and measured. The waist on this pattern measures 19 1/2 inches (9 3/4 per side).

To compare, the waistline on the last pattern I enlarged measured 27 1/2 inches, so this was a small corset. To expand the pattern I slashed down the center of each piece and spread them apart until I hit the measurement I needed.

I measured 4 inches below the waist, roughly the top of the hip bone, and 3 1/2 inches above the waist, the underbust, measured across, then figured out how much I'd have to reduce or enlarge those areas. I drew the new seam lines in blending the new points into the old using a hip curve.

I added an inch to the top edge of the pattern so I'll have plenty of fabric to work with when fitting the bust.

One last adjustment. I made a corset for myself and drafted the underbust line and bust apex at my real life measurements. The finished corset looked matronly, the bust looked heavy and there was overflow at the top sides. Not pretty. So I decided to slash through the pattern between the waist and the underbust and lengthen everything 1/2 inch. Hopefully this helps ward off a potential repeat of that unattractive situation.

After I true the seam lines I can cut this out, trace it off on fabric, add seam allowance, and sew the mock-up.
April 3, 2009
next corset

By the late 18oo's corsets were so heavily constructed they must have been uncomfortable to wear in the heat. To ease this discomfort some corsets were designed from mesh fabric like the one in this ad.

Or they had latticework like this one from the Victoria & Albert Museum.

© Victoria & Albert Museum (museum number T.184-1962).
Honoring the ground rules I rummaged through the fabric I have jammed in boxes, and found this.

A couple of years ago I bought some linen at a garage sale and folded up in the same plastic grocery bag was the adia cloth. I didn't want the adia cloth, but in the way garage sale haggling can work I got a couple dollars off on the condition that I not leave it behind. Now someone's unrealized embroidery project will become my corset.
I've never used a spoon busk before, or worked with adia cloth, or done cording, so this should be interesting.
April 1, 2009
1904 done

And from the back.

These pictures are not the greatest, taken in a mirror, but I couldn't wait to have someone else at the shutter. All in all, not bad. There are several things I'd do differently if I were to build this corset again. I can not stand the stitching across the top and bottom of the busk and lacing strips. I'd sew them by hand to give a nicer finish. I'd use metal boning by the laces and use a smaller size grommet. These look just a little large in proportion to the rest of the garment. But I'm happy with the fit and with the changes I made from the mock-up. I would sew this pattern again. I'd love to try it with real ribbons or with by fusing satin to batiste to see how it works when lighter. Even though there are not a lot of bones in this corset the coutil makes it very solid. If one were to wear a corset while playing tennis or bicycling I believe this would be the style to wear. In fact, I'll take it for a spin on my bicycle and report how it functions.
Here are the statistics.
3 yards - 4" double face satin ribbon
4 yards - 3/8" double face satin ribbon
1 - 8" busk
2 - spools thread
coutil scraps
16 - double zero grommets
not even 2 yards (58") 7mm plastic boning
number of seams picked out - 10
finishing up

Plus, I used plastic for the mock-up, now that I've got all those short pieces it would be nice to put them to work. I slid them in the openings I left along the bottom edge, three to each side, and one along each side of the grommets.

I stitched across the openings to sew them closed, and that's it. The construction is finished.

Subscribe to:
Comments (Atom)


