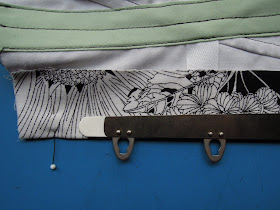
The loop side of the busk is built into the right hand side of the corset. That's right hand side as you are wearing it, not as it sits in front of you on the sewing table. Fold and press the facing at the notch mark at the top of the center front. With the addition of bone casings the corset should have a bit more structure and if you hold it against your body at the waist you should be able to see where the top edge falls in relation to the bust. When I held my corset against myself I decided I didn't need the full extra inch added to the top, just a bit of it. So I marked the top of the center front with a pin. The top of the busk should be about 1/2 inch below this point.

Open the facing and position the loop side of the busk against the fold, about 1/2 inch from the top edge of the corset. The pin you see in the picture below marks my top edge. Mark the placement of the loops with a pencil.

Make those markings clear and double check them. This is one of those measure twice and cut once points because the cut is made on the fold. When you've got everything clearly marked cut the openings for the busk loops with an exacto knife.

Sharp scissors will work if you don't have an exacto knife. If you are concerned about the slit fraying you can finish it with a buttonhole stitch, or hit it with a bit of fray check. I'm doing neither. I know! That's so unlike me to just leave a raw edge. But plenty of teens era corsets were made this way, I trust it will work for my corset too. After all the slits are cut slip the busk loops through.

Fold and press the edge of the facing, there should be a point at the top where you fold, but if not just fold 3/8 then press.

Trim any excess waist tape. I trimmed mine so it's long enough to just reach past the edge of the busk, and I lay it on top of the busk before I pin the fold in place so it will be behind the busk when everything is finished.

Once the fold is pinned, sewing from the front, or exterior, of the corset, sew a straight line from top to bottom with your needle right against the edge of the busk.

Flip the corset and from the interior of the corset sew the facing 1/16 to 1/8 from the folded edge.

I used a tapered busk so I sewed around the top and bottom of the busk, but if it was a plain old everyday busk I would have just sewn straight against the edge and called it a day. Here it is all nice and neat from the front.


What type of foot are you using in this post?
ReplyDeleteIts a zipper/cording foot where you can change the side of the needle. My sewing has come to a halt as I need to wait for my zipper foot to arrive in the mail. My wonderful singer 66 treadle came with all kinds of feet, but not with this one important foot! :/ But I've already placed both sides of the busk in place and set the grommets, so I don't think I will be much behind in the end :)
ReplyDeleteAhh ok thanks. My zipper foot looks completely different I think I may have to invest in one of those.
DeleteOh my goodness! I completely forgot to mention switching to a zipper foot.
ReplyDeleteHmm.. so apparently the loops on my busk are not evenly spaced across the busk so there's essentially a top and bottom... And of course I placed it backwards when marking the placement of the cuts.. sigh. I can only align the three middle cuts with the busk oriented in the right direction. Guess I'll just need to lengthen the other cuts to make the busk fit? Chalk this one up to learning!
ReplyDeleteOh no! I didn't even think about that! You make new cuts you can stitch the others closed, if you find the error too glaring you can always cover the center front edge with some sort of trim. My guess is it won't be that noticeable though.
DeleteI enjoyed reading your blog, thanks
ReplyDelete